|
Need more info or you couldn't find what you were looking for, let us know by sending an email to: support@dancik.com.
Entering Invoices From Orders - IVC 1
This option enters invoices one order at a time. When an order is invoiced using this option, the orders notepad is automatically updated to show who made the change and when and where it was made. This provides a simple way to track who, when and where invoices are created using this method. Normally invoices are created by status code (IVC 2), which is a more automated process.
Including Add-on or Fixed Promotional Pricing
Overriding Handling Charge Descriptions on Invoices
Turning off Interest Charges at the Invoice Level
1. From The Invoicing Menu, select option 1 - Enter Invoices - from orders. This option allows you to pull orders one at a time into the invoicing program for printing preparation.
Note: If you invoice by status, you do not need to use this option. Only use this option if you want to change an order after you invoice by status code. Direct ship orders must be invoiced using this option.
|
Field |
Description |
ENTER ORDER# |
The order you are invoicing. |
ENTER LINE# |
Enter a specific line number on the order if you are updating the line for changes. If you enter a line number, the next screen you see when you press Enter is the order detail screen for that line number. If you leave this field blank, the invoice will be for the entire order and you proceed to the order header screen. Leave this field blank when you pull the order into the Invoicing program. |
ENTER ACTION CODE (A,U) |
An A essentially creates a new invoice and a U updates an existing one. You can only use the A option one time for an order. After that you must use update an invoice via the U option. |
Enter Ship Date |
This field automatically defaults to today’s date. Leave this field blank if you want to use the ship date from the order. |
Limit To Status Codes |
You can input up to four status codes. This directs the system to only generate invoices for order lines that are at that status. If any status codes are entered, press F2 (to process complete) to invoice only the lines that are at one of the entered status codes. Other lines are left open or cancelled according to your order handling codes or default invoice back order codes. This method is primarily designed for use with the S code and it’s retail environment counterpart Z (which indicates shipped). If you are scanning, or manually updating orders to an S status as each order line is shipped or picked up, then invoicing only S lines will accurately bill only what has shipped. If you always want to use this method, you can preload the status codes that should be invoiced in the Control Panels of the users who will be invoicing. Once loaded in the Control Panel, the status codes appear on the Invoicing Screen each time the invoicing is entered from those workstations. By entering status code S (indicating shipped) in the Limit to Status Codes field, the Invoicing Program pulls only those lines at status S. Up to four status codes can be entered, although the S code is the most logical link to invoicing. |
Hash Invoice Total |
Enter the total cost of the invoice here. The system then compares your manually input total against what it comes up with using information within the system. You can use this field to ensure the accuracy of the data in your system. This field is optional. |
2. At a minimum, you have to enter the order number and Action Code (A or U). You can use the other fields to narrow the invoice to a specific lines or statuses.
3. At this point, you have two options:
Press F2 - Process Complete. Use this option if all the lines on the order have been shipped and are ready to be invoiced. You can also use the status code field to limit the invoice to the lines that are ready to be invoiced. This invoices the entire order or the lines at the specified status codes and brings you to the review screen and line 9990.
|
Notice all the lines of the order are listed at the top of the screen and are ready to be invoiced. Here you can add freight to line 9990 and/or add handling charges in the HC field.
The review screen also shows the customer’s pricing method and the margin at each line. This lets you review and make corrections prior o printing the invoice.
Press Enter to Invoice line by line. This route takes you to the order header.
|
Press Enter, to proceed to the shipto screen.
Note: At this point you can still press F2- Process Entire Order. This takes you back to the Review Screen instead of going through each line of the order.
Press Enter to display the order detail screen for the first line of the order if you want to go through the order line by line. Once you are the detail screen you cannot exit the program until you go through all the lines.
|
If lines are billable, enter twice to accept all lines (e.g. 10, 20, 30). If lines are not billable, press F4 (delete) twice to delete lines (This will leave the lines open to bill at a later date).
For Miscellaneous (F6) lines, you can press Enter on screen to invoice. After all lines are completed it will go to line 9990. Here you can add freight and/or add handling charges in the HC field. The line that are being invoiced are displayed on the top portion of the screen.
|
For a Direct shipment orders, you must enter the supplier's invoice number and invoice date in the date field.
When all the steps of invoicing are completed, always remember to press F1 to review. Then Enter to accept. Repeat until all orders are completed then press F7, end of job. Orders that have gone through the invoicing process are marked as “BEING INVOICED” until after night jobs.
The next steps in the invoicing process are:
Print an invoice edit (option 3 on the invoice menu)- This produces a report that lets you review your invoices before you actually print them. This step is optional.
Print the Invoices (option 4 on the Invoice menu) - Sends your invoices to a printer. You must run this option in order to process your orders as invoices and create an invoice number for each order.
Including Add-on or Fixed Promotional Pricing
This functionality allows you to include descriptive information regarding “add-on or fixed pricing” on your invoices. These add-on promotions should not be confused with other promotional prices that normally print on invoices.
Examples of these fixed add-on prices can include:
Servicing National Accounts for Manufacturers
Freight
Fuel Surcharge
Special Handling
Note: In order for this functionality to work, one or more of the options on the System Wide Setting - Options for Invoices have to be activated.
This functionality does not work with invoice format “K”. Format “K” is meant for companies that want to show the list prices and discount percentage of each item, instead of a net price.
1. Additional costs/promotions are assigned as a pricing exception (F9) or as a marketing program (F14) within the Billto File (FIL 1). In the example shown below, if material is ordered from manufacturer Rex, Promotion Program FRTPGM is applied or added as a fixed price to the invoice.
|
2. To see the details of the promotion, access it through the Promotional Pricing File (FIL 30).
|
3. In this example, an extra $.35 per UM is added to the purchase. The type “F”, for fixed, forces the $.35 to be added to the regular price.
Overriding Handling Charge Descriptions on Invoices
A System Wide Setting, “Options for Handling Charges”, controls the term that actually appears on invoices and order acknowledgments. The default term is “Handling Charges”. By changing the term to “Fuel Surcharge”, you may effectively create a fuel surcharge that is a percentage of the invoiced amount.
If the term has been changed (i.e., to fuel surcharges), then the new term is what is displayed on invoices and order acknowledgements. You can change the term as needed to recoup expenses such as fuel surcharges. The invoice displayed shows the term Fuel Surcharge where Handling Charge would normally appear.
Note: Do not confuse Restock Charge % on Credits with regular Handling Charge %. Restock is at the line detail, and Handling Charge is at header level. If both are used, then the original term “Handling Charge” is used. When both charges are used, they appear in the same total field on the Invoice or Acknowledgement. If only restock% is used, it will say Handling Charge - and NOT use the overridden term. If only the handling charge is used, then the overridden term is printed.
|
A “job style” invoice only lists a single job price, and omits the underlying line-item detail. For example, a job can include several products, plus various services, freight, labor etc. On regular invoices, all line items are listed, followed by a total. A “job style” invoice lists just a description of the job (to whatever level of detail you want to include) and an overall job total. Job style invoices are controlled by special F6 Miscellaneous prefixes.
A “job style” invoiced is created as follows:
On the order, enter “J*” (J followed by an asterisk) on line 0001, followed by a description of the job, such as: “J* Complete bathroom with imported Italian tiles.”
The J* lets the invoicing program know that no lines other than lines prefixed with J* should be printed, except for the totals.
The options for “job style” invoices are as follows”
The suppression of the printing of line items begins with the first “J*” line encountered. Thereafter, only lines beginning with “J*” are printed followed by the total. For example, if you entered lines 0010 and 0020, and then entered “J*” on line 0021 the invoice will print all lines through 0021. Thereafter, only F6 lines beginning with “J*” will print.
Job style invoices do not affect accounting. All lines are still included in the calculation of the invoice totals. All lines are still posted, and appear on the Invoice Inquiry screen.
The following is an example of an order keyed as a “Job Style”.
|
The following is a copy of the invoice for the order shown above (using the Job Style).

The following is what the invoice would look like without the Job Style.

There are distinct approaches to assessing and tracking interest/service charges for past due invoices.
Method “A” Interest/Service Charges is a “memo-only” approach, in which monthly statements show the interest amount due, but accounts receivable is only updated when interest is paid.
Method “B” Interest/Service Charges features a monthly interest invoice sent to each past due account, which is posted to accounts receivable and is tracked just like a regular invoice.
Method “C” Interest/Service Charges are calculated on a “per invoice” basis, and are charged as soon as an invoice passes its due date. Method C interest is the only option that is not calculated as part of the Accounts Receivable End of Month Process.
Method “C” Interest/Service Charges work as follows:
1. Method “C” is declared in the Company Settings file, and activated in the System-Wide Settings for Accounts Receivable Options.
2. Method “C” interest/service charges are only applied when the terms code of an invoice is set to trigger Method “C”. The Payment Terms file must be updated, as shown in the example below.
|
3. The field Service Fee % _______ if _______ Days Past Due Date relates to Method C Interest/Service Fees.
The number of days past the Net Due date is considered the “grace period” before service fees are accessed. This field can not be set to less than 1. Having this option in the Payment Terms file provides for service fee variation, based upon the customer and/or products. This is more flexible than a “global” approach.
Note: This field only displays if Interest Method C is activated in the Company File.
4. All invoices with terms codes that are set to trigger Method “C” interest will show the due date, and the amount that must be paid, including interest, if the invoice is paid later. In effect, the invoice shows the customer what the applicable interest/service charges are if paid late. For example, an invoice might include: Pay 95.00 if paid within 15 days, pay net amount (100.00) if paid by due date, and pay 105.00 if paid after due date. A Method “C” interest/service charge is similar to a “negative discount”.
5. Method “C” interest may be set to use an interest rate as entered in the Payment Terms File, or as entered in the Billto File.
6. Every night the system monitors all invoices by the due dates. Any invoice that goes past the grace period allowed for in the Payment Terms File is automatically updated with interest/service charges. The interest charge is added to the invoice amount, and shows in AR history as a special invoice with the same invoice number as the original invoice, but with the transaction code “0X” for “interest/service charge”.
7. Once an invoice is updated with Method “C” interest, it is never updated again. The invoice is flagged in A/R as having interest, and a “0X” appears on the right side of the AR Ledger screen near the Customer PO number. In order for the invoice to be fully paid, the customer must pay the interest/service charge as well. Unlike Methods A and B, the interest charges are directly linked to each invoice, instead of being a single blended late fee for a past due balance that may include several invoices.
8. Because Method “C” interest/service charges become part of the invoice amounts, there are no separate interest charge invoices printed or stored in A/R. From an accounting perspective, the amount of interest/service charges added each month is accumulated under the “0X” transaction code. This is similar to Method B. However, unlike Method B, there is no totally precise way to measure how much of the Method “C” interest/service charges were paid. If a customer partially pays an invoice with Method C charges included, it is not possible to say what part of the payment applies to the interest/service charge versus the original invoice amount. However, by running an “AR Past Due Aging”, you can estimate the amount of interest/service charges that are still open. Then by comparing what remains open to the interest charges booked, you can deduct the interest amount collected.
The following is a sample invoice with Method C interest charges. Note that it prints how much should be paid, if paid after the due date, including the service fee.

Turning off Interest Charges at the Invoice Level
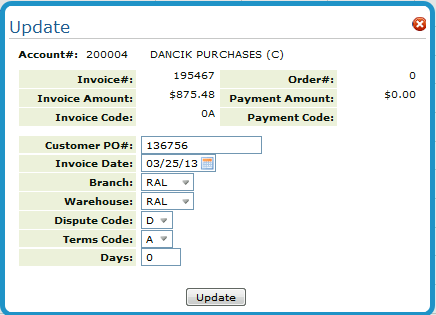
AR Dispute codes can be attached to invoices in which you may want to flag for some particular reason. These codes can be created to prevent the invoice from aging or being charged interest. For example, if a customer short pays an invoice due to a pricing dispute, you may not want to charge interest on this invoice, or age it as showing past due. You could then flag this invoice with a dispute code that you have created.
AR Dispute Codes, are created via menu option ACT 104 on the Accounting File Maintenance Menu.
On the Dispute Code Profile screen. Enter an "N" in the field Charge Interest?
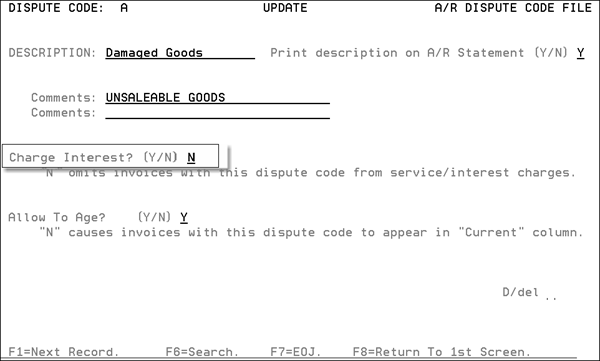
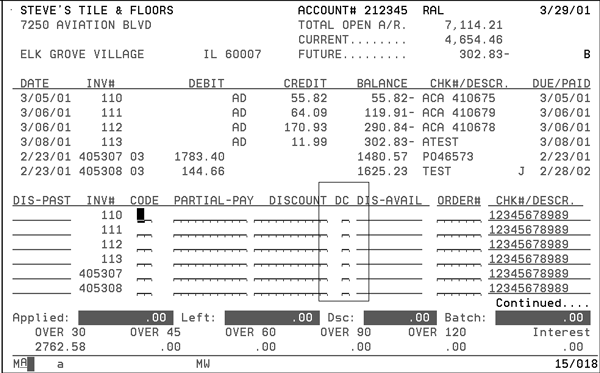
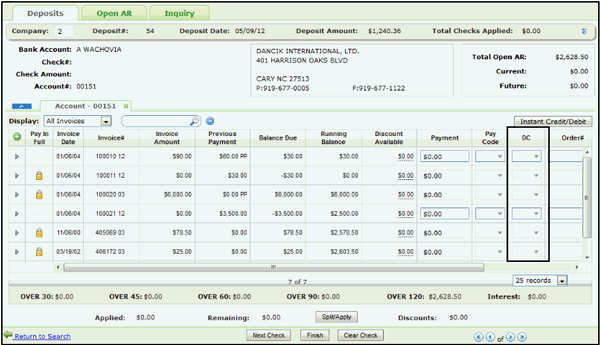
After establishing the dispute code, it can be used in the DC setting on the AR Cash Application menu.
Green Screen (menu option AR 1)
Navigator (Deposits tab on the AR Application)
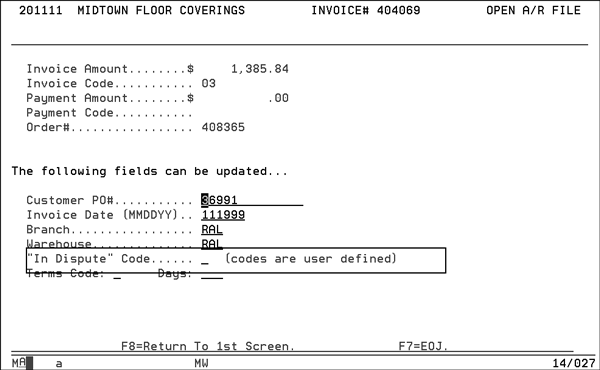
Or through Open AR.
Green Screen (menu option AR 20)
Navigator (Open AR Tab)
Invoicing by Status Codes - IVC 2
Printing Invoice Edits - IVC 3
Void and/or Reinstate Today's Invoices - IVC 5
Printing Invoice Registers - IVC 6
Order Pricing Analysis Report - IVC 7
Automatic Archiving (Rollover Invoices)
Invoicing By Truck Route & Status
System Wide Setting - Options for Invoices
System Wide Setting - Options to Suppress Printing of Invoices
System Wide Setting - Automatic Pick Lists for Items Backordered while Invoicing
System Wide Setting - Invoicing Pricing & Promotions Pricing ShipBy Analysis Rpt
Do the invoice overlays require an IPDS printer?
Balancing and Rounding Funds on Invoice Register versus GL Sales Reports
Clearing Fund balances over $100,000.00 via invoicing not totaling correctly
Why do some invoices have leading zeros and some don't?
Invoicing_orders still on credit hold - NOT recommended but allowed
What File contains the currency and exchange rate when an order is invoiced?
How to change the address for PO's so the supplier knows where to send their invoices
Does invoicing look for current/expired promotions?
What printer option controls the COD invoicing and reports
Changing address on the Billto account WILL change the address on an existing invoice
Invoiced orders now showing quantity and price when doing order inquiry - what setting controls that
How many lines can be on an invoice?
Night Job Reports what gets run?
Cost difference between order and invoice. Why?
Why are Promotional Points showing up on invoices?
How can I tell if any invoices were missed when I preformed a purge?